It is easy to set-up a camera timer in your iPhone. The timer icon will show up highlighted in yellow on the camera screen. You will need this timer setting before you take the photo. You can also use a tripod to take photos with the camera timer. A tripod can help you take a steady and stable photo.
Apps that are compatible with the camera's timer
The iPhone camera's timer feature allows you to take a photo after a specified time. You can set it to take pictures every 3 seconds or every 10 seconds. This can be used for either group shots, single shots, or pictures taken from a specific angle.
There are many applications that can be used to sync with the iPhone camera timing. Self Timer and burst mode are the most used. Both apps can be used to simultaneously take multiple bursts. To take a self timed photo, open the Camera app and position your iPhone where you want to take it. Next, tap and hold the clock icon in upper right corner. Choose a countdown duration, such a three- or ten second time limit. Once the timer is complete, press the shutter button to take the picture.
Setting the timer
The Settings for the iPhone camera timer can be tricky to find. You might find the timer in the control strip on your iPhone or under the clock face button. If you cannot find it, please look at the upper right corner. Tap on Timer icon. A timer window will appear that allows you to delay the photo for three or ten minutes. Tap on the timer and choose how long you want to delay your image.

The Portrait and Photography mode settings contain the settings for your iPhone's camera timer. To turn it ON, press and hold the shutter button. This will set the timer. After a few seconds, click the shutter button and take the picture. The countdown will display on the screen and the image is automatically saved to the Photos App.
Take photos with the timer
The iPhone camera timing feature makes it simple to take photos using your iPhone, without even having to hold the camera. Open the camera app, tap the up button at the top of your screen, then click the timer icon at bottom of the menu bar. The timer will now be displayed in the upper right corner of your screen. You can set the timer from 3 to 10 seconds.
The timer function will work with both your front and rear cameras. You have three options: Square, Portrait, or Photo. This will enable you to take a photo hands-free and with no tripod.
A tripod is useful for taking photos
You can take better self portraits with your iPhone by investing in a tripod. A tripod can be used to set the angles of the photos and it also allows for more control over the time taken. One of the best iPhone tripods is the Lamicall Phone Stand, which lets you adjust the angle of the phone to take the best selfies. A great tripod is also the UBeesize 51 inch "Extendable Tripod Stand", with a Bluetooth remote. When taking a selfie with your iPhone, first position yourself against a light source that is neutral. Then set the timer at ten seconds. After the timer is over, switch to burst mode.
With an iPhone, a tripod will help you take better photos with low light and camera shake. You can adjust the shutter speed using the tripod. You can set the tripod to lower the shutter speed while still taking great selfies. To do this, you'll need to unlock the iPhone and toggle Bluetooth. After Bluetooth is enabled, the iPhone can be paired with the remote shutter button. Finally, attach the iPhone to the tripod adapter.
Avoid camera shake with timer
The iPhone camera clock is a great tool to avoid camera shake especially when taking photos in dark conditions. You should keep your hand away from the camera, and let the camera focus on the subject before you press the shutter button. The iPhone camera timer will help you avoid this challenge. For long exposures and landscapes, the timer can be set at three seconds. Simply remove your hands from the camera after the timer has finished its job and then let go.
The timer is not only useful for taking photos in low light conditions but can also be useful for other purposes. The timer will prevent the camera shaking when you take a photograph of a product. The timer will prevent camera shake from ruining photos. You can use the timer for product shots, as well as ones with hand models and objects that are held in position.
FAQ
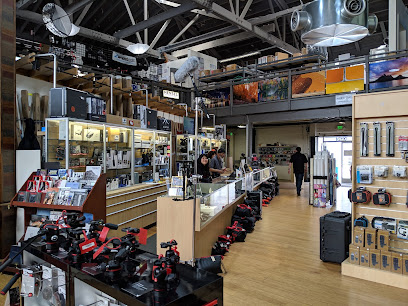
Where to Buy Cameras?
Cameras can be purchased online from many different places. We recommend purchasing from a trusted retailer such as B&H Photo Video. They have knowledgeable staff that can help answer any questions you may have.
B&H also ships quickly and securely, making it easy to get your order delivered to your door.
This video will help you learn more about buying cameras.
What camera is best for beginners and what are the pros and cons?
The best camera for beginners depends on your budget, needs, and skill level.
For instance, you could choose a point & shoot digital camera if your goal is to save some money. These cameras have a good quality, but they are not very versatile.
Digital Single Lens Reflex cameras come with interchangeable lenses which allow you to capture different types of images. While they are more expensive than point and shoots, they offer much more flexibility.
For beginners to photography, the beginner's set is a great place for you to start. Everything you will need, including a tripod, flash, memory cards and lens, can be found in one package.
You should also remember to buy additional batteries.
Which Lenses Do I Need?
The most frequently asked question by beginners is "What lens should i buy?" It's a tough decision since there are so many options available.
The good news? You don’t have to purchase a completely new lens for every new camera you buy. Instead, you can buy additional lenses later.
These are just three options for lenses that you might consider.
-
Wide Angle Lens (14mm - 24mm): These lenses give you a wide angle of view, allowing you to capture more of your subject. Zooming in can be done without affecting image quality.
-
Standard/Normal Zoom Lens (28mm – 70mm): These lenses allow for you to adjust focal lengths and maintain image quality.
-
Telephoto Zoom Lens (70mm - 200mm): These lenses are great for capturing distant subjects. These lenses allow you to focus on your subject, even though they may appear small in the frame.
You can also combine these lenses to create different effects. For example, you could use a normal lens to shoot close-up details and switch to a telephoto lens to capture far away objects.
What equipment do I need to get started in digital photography?
First, you need to decide what type of camera is best for you when you first start digital photography. There are many options available, including DSLRs (digital single-lens reflex cameras), compact point-and-shoot cameras, camcorders and smartphones. Each model has its own unique features and advantages. DSLR cameras can produce high-quality images, but they are usually heavier and more bulky than other types. Point-and-shoot cameras are smaller and lighter and often include automatic settings for certain situations. Camcorders provide excellent video recording capabilities and may also feature still photo shooting modes. Smartphones are small and lightweight so they can be easily carried.
Once you've chosen the type of camera that you want, you can decide whether to purchase a used or new model. Even if the cameras were bought in the last few decades, they can still be purchased at reasonable prices. Because manufacturers invest large sums of money in developing new technology, new models tend to be more expensive.
Next, you need to purchase lenses. The quality of your photos is directly affected by the lens. They let you adjust the focal length to zoom in and out of the scene, without losing focus. Some lenses include built-in flash units. Others require external flash. A wide range of lenses is available from various brands, each offering unique characteristics.
Finally, memory cards are something you should consider. Memory cards are used to store images taken with your camera. Your card's size will determine how many pictures it can store. Multiple memory cards are required if you intend to take many pictures.
Do I want to start taking photos as a hobby?
Photography is an excellent way to capture memories and share them with friends and family. It allows you to discover more about the world.
There are many resources online that will help you take better photos if you're interested in this topic.
It may be worth looking into classes at community colleges and art schools. This gives you the opportunity to meet other photographers, who can offer valuable feedback.
Statistics
- By March 2014, about 3 million were purchased monthly, about 30 percent of the peak sales total. (en.wikipedia.org)
- This article received 13 testimonials, and 100% of readers who voted found it helpful, earning it our reader-approved status. (wikihow.com)
- The second easiest way to get blurry photos 100% of the time is to use a cheap filter on the front of your lens. (photographylife.com)
- In this case, 100% of readers who voted found the article helpful, earning it our reader-approved status. (wikihow.com)
External Links
How To
How to take photographs in low lighting conditions
Low-light photography refers to taking photos in dimly lit or dark environments. This requires special equipment and techniques. The main challenges include controlling exposure, white balance, and sharpness. There are two types of low light photography: flash and ambient. Flash photography works well when there is sufficient light around you. However, if there's not enough natural light around you, you'll need to use flash. Without a flash, it is possible to get a poor picture if the subject is indoors and not outdoors. You can also shoot at night when the moon is shining. This will give you some beautiful shadows and colors. Another option is taking photos at twilight. Twilight is the time when the sun has set and there's still daylight.
Long exposures may be something you want to explore. Long exposures enable you to take images even after your shutter has been open for several seconds. The camera records only light falling on the sensor if it is kept closed. This light continues to fall onto a photo sensor throughout a prolonged exposure. Because the shutter was closed, no new light enters your lens. You will see very little movement as a result. To ensure you're getting a clear image, turn off any automatic settings like autofocus and auto exposure. Adjust the ISO setting before you start to shoot. An ISO setting of 200 will give you more control over the brightness or darkness of your image. The shutter button should be pressed quickly when you are ready to take the photo. This will make the shutter close completely. Hold the shutter button down for the final second. By holding down the shutter button, you prevent additional light from entering the camera. Once you have taken your picture, wait for a few moments before you release that shutter button. This allows the camera to process the image. While you wait, your photos will be displayed on your computer's screen. Once you are satisfied with the photos, save them onto your computer.