When it comes to low light photography, you have several options. There are many options for low light photography. You can either use a diffuser or increase your ISO. You can also use the flash to increase lighting, or a flash that has a diffuser. If you are trying to capture an interior scene, you may want to balance the lights with your subject.
The aperture can be increased
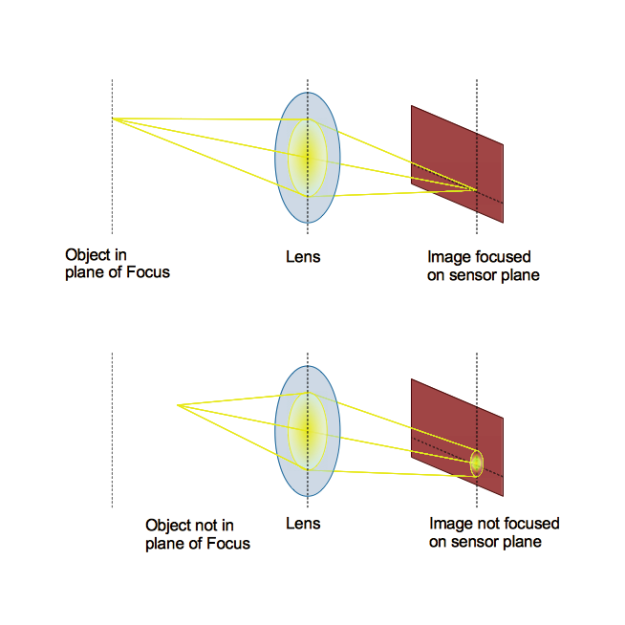
Aperture is one of most critical settings for low-light photography. A wider aperture allows for more light to pass through. It ensures that photos are well-exposed.
Increase the ISO
If you've taken pictures under low light conditions, you may have wondered if increasing the ISO will make them look better. High ISO settings can produce grainier images but they have an advantage over lower ISO settings. The results will be better if you use high ISO levels.
Flashing a lightbulb
Flashes are a great option when taking photos in low light. A flash can light up a subject more efficiently than ambient light. It can also allow you to use wider apertures and faster shutter speeds.
Use a diffuser
Diffusers spread light across a wider area to help reduce shadows, sharpen objects and increase brightness. However, diffusers will lose some of their light to the surroundings. This is unlike light reflected by reflectors, which are a concentrated source.
Use a tripod
A tripod is one way to get sharp pictures even in low light conditions. A tripod is a better option than hand-held photography. You don't need to shake the camera which can lead to blurred pictures. The tripod can keep your shutter open for many hours without blurring the picture. A tripod has its limitations. High winds, for example, can cause a tripod to shake.
Mounting your cameras on a stable surface
When taking photos in low light, it is important to mount your camera on a stable surface. For stability, you can use a chair or table. Or, you can use a monopod or tripod. These accessories will allow for you to pre-set the exposure and camera position. However, you can still move freely and take photos.
A long exposure
For a wide range of photography scenarios, long exposures are a good choice. They can be used to capture water, clouds, and foliage. Clouds can create amazing streaks in a sky and serve as leading lines for your images. Images can also be made from moving water and cars. These sources can be captured at different speeds.
Increasing the CWB
An image's color balance can be improved by increasing the CWB. It can be used on a variety of subjects including leaves and objects. Depending on the light conditions, the amount of CWB that is applied can be adjusted. If you shoot in low-light conditions, you can adjust the amount of CWB to increase the contrast.
Using a faster lens
A fast lens is necessary when shooting in low light. Fast lenses feature a larger aperture diameter that allows for greater light capture and quicker shutter speeds. This allows for images to be captured with a better exposure. This also makes it possible to shoot at lower ISOs. This helps reduce noise.
FAQ
Cameras available for purchase
There are many places online that you can purchase cameras. B&H Photo Video is a well-respected retailer. They have knowledgeable staff to answer your questions.
B&H ships quickly and securely to make it easy for you to get your order to your door.
You can learn more by watching this video about shopping for cameras.
Is photography a rewarding job?
Photography is an art that allows you take pictures and share them. It is also a great way to make money if you are willing to put in the hard work. There are many paths to professional photography. You can start by taking photos as a hobby for family and friends. This will allow you to build confidence and improve your photography skills. Once you have mastered this stage, you can move on to paid assignments. The best photographers are able to make a living out of their work. They may take clients to events such as weddings and parties, where they must capture images of people enjoying themselves. However, most professionals prefer to shoot commercial projects such as product shots or advertisements.
Finding the type of photography that you love is key to being a successful photographer. Continue to practice, experiment and learn new techniques until your skills are perfected. There is no substitute for experience, so don't expect to succeed overnight.
Begin with technical skills, before moving on to creativity. Photography encompasses both technical and artistic aspects. You will be able to succeed quicker if you learn how to use the right tools, and the basics of composition.
You should also consider whether you want to pursue a career in photography full-time or part-time. Many people combine their passion for photography and other jobs. One example is working at a local magazine or newspaper while taking on freelance assignments. Others decide to dedicate all their free time to photography. It doesn't matter what way you go, success in any creative field requires dedication and commitment.
Photography is a serious career. You must put in a lot time and effort if you want to succeed. You should think about whether this is something you want to dedicate your life to.
Do I Need A Tripod?
This is a question everyone asks. While a tripod isn’t necessary every time, it is useful.
It allows you to hold your camera steady when taking pictures at slow shutter speeds. If you're shooting landscapes or other stationary subjects, then a tripod can make a big difference.
However, tripods can blur the images of moving subjects like sports and people. How can you tell which situations call for a tripod and why?
A tripod can be useful in any situation where you need to capture fast action or stationary subjects. Examples include:
-
Sports
-
People
-
Landscapes
-
Close-ups
-
Macro shots
Try this test to find out if you really need a tripod. Take your camera and hold it still. Then, look through the scope. You will need a tripod if you see blurred lines and movement.
If you don’t see blurring, adding a tripod is unlikely to make any difference.
However, if you do decide to invest in a tripod, here are some tips to keep in mind.
-
Smooth legs are important for tripods. This prevents unwanted vibrations from shaking your camera.
-
A tripod is a good choice. Some tripods can be made out of plastic but they are not very durable. Look for a metal tripod instead.
-
Consider purchasing a remote release. This allows you to control your camera remotely. You can set it to fire the shutter once you press the button automatically.
-
A tripod that can rotate 360 degrees is a good choice. It makes it easy to position your camera horizontally or vertically.
-
You should keep in mind that tripods don't come cheap. Expect to spend around $100-200. You will still get a lot out of your money.
-
Accessories such as memory cards and filters are important.
-
Before you buy online, make sure to check your local shops. Many retailers offer free shipping.
-
Review a product to find out what other customers think.
-
Ask family members or friends to share similar products.
-
For customer feedback, visit message boards and forums.
-
You can search online for reviews from other users.
-
Amazon.com makes it easy to compare prices and see customer feedback.
-
View photo galleries to see the different uses of tripods by photographers.
What camera should I get?
It all depends on your goals and what type of photographer you are. If you're just getting started, a basic point and click camera will suffice.
You'll probably want something more advanced once you've learned the basics. The decision is yours.
These are some considerations before you purchase a camera.
-
Features: What features do you need? Are you going to use autofocus, manual settings, or both? What number of megapixels has your camera? Is there a viewfinder on your camera?
-
Price: How much do you want to spend? Are you planning to upgrade your camera every year or two?
-
Brand: Will you be happy with the brand you select? You don't have to settle for anything less than the best.
-
Functionality: Can you use your camera in low light situations? Are you able to take high-resolution images?
-
Image Quality: How clear are your images and how sharp are they?
-
Battery Life: How long will your camera last between charges?
-
Accessories: Do you have the ability to attach flashes, additional lenses, and so forth? ?
How can I learn how to photograph on my own.
There are many different ways to learn how take great photos. You have the option to buy a book and attend classes, join an on-line community, or watch YouTube tutorials. If you really want to learn how to take pictures, it's best to do it yourself. That way, you have complete control over what goes into each photo. As long as you continue learning, you will always be improving.
One of the greatest things about digital photography, however, is the fact that you don’t need expensive equipment. All you need is a computer with internet access and a camera. The rest is up for you.
Here are some tips to get you started.
-
Make sure you are familiar with your camera’s manual settings.
-
Learn how to use the basic controls.
-
Take many photos.
-
These should be edited.
-
These should be shared.
-
Keep practicing.
-
Experiment.
-
Consider different angles and perspectives.
-
Use light sources creatively.
-
Practice makes perfect.
-
Don't be afraid to fail.
-
Be patient.
-
Have fun!
Statistics
- While I cannot prove that all of those spots were not sensor dust, the photo was taken during a heavy snowstorm…so I guess that 99.8% of the spots are snowflakes. (bhphotovideo.com)
- By March 2014, about 3 million were purchased monthly, about 30 percent of the peak sales total. (en.wikipedia.org)
- That's the easiest way to get blurry photos 100% of the time. (photographylife.com)
- Get 40% off Adobe Creative Cloud(opens in new tab) (creativebloq.com)
External Links
How To
How to take photos in low light conditions
Low-light photography is the art of taking photographs in dark or dimly lit environments. It requires special equipment and techniques. The main challenges in this field include controlling exposure, whitebalance, and sharpness. There are two types of low light photography: flash and ambient. Flash photography works well when there is sufficient light around you. A flash is required if there isn’t enough light. For example, if your subject is indoors but outside, there might not be enough light to capture a good picture without a flash. Try shooting at night, during the moonlit hours, if you don't need a flash. You'll be able to capture beautiful colors and shadows this way. Another option is to capture at twilight. Twilight is the time when the sun has set and there's still daylight.
You might also be interested in long exposures. Long exposures can be used to capture images even if the shutter has been closed for several minutes. When the shutter remains closed, the camera records only light that falls on the sensor. This light continues to fall onto a photo sensor throughout a prolonged exposure. However, because the shutter remained shut, no new light enters the lens. As a result, you see very little movement. To ensure clear images, disable any autofocus and exposure settings. Before you begin shooting, adjust your ISO setting. An ISO setting 200 gives you more control over how bright or dim your image appears. Finally, when you're ready to take the shot, press the shutter button quickly. This causes the shutter to close completely. Hold the shutter button down for the final second. The shutter button should be held down to prevent more light from entering the camera. Once you have taken the image, wait for a few seconds before you release it. This allows your camera to process the picture. While the image is processing, you can see your photos on your computer monitor. Save them once you are satisfied with them.