
There are many ways to capture great photos of the beach. One of these is to avoid people in the photo, take advantage of the golden hours, use a wide angle lens and use a polarizing filters. These tips will enable you to capture stunning beach photos without losing quality. Learn more about these tips and others. This article will help you take stunning photos at the beach.
Golden hour
The best time to take a photo of a beach in golden hour is to get there just right. The light during golden hour is much warmer than normal and contains a lot of red, orange and yellow colors. This is because the atmosphere filters out blue light as the sun approaches the horizon. Many people associate this color pallet with happiness. You can make the most out of the light by planning your shot in advance. Also, be sure to get to the location as early as possible. Once you have done that you can simply watch the lighting change and then adjust as necessary.
Wide-angle lenses are recommended
Photographers who wish to have a strong view of the beach can use a wide angle lens. A wide-angle lens should be used during daylight hours when there is ample light. If possible, use automatic settings, so your photos are sharp and free of blur. For bright sunny days, you should use a fast shutter speed. This will give your images a deep depth.
Use a polarizing lens
Photographs of beach scenes can be improved by using a polarizing lens. It reduces the amount of glare that can cause problems in a beach scene. This filter attaches onto the lens's thread and can then be rotated to achieve the desired effect.
You should not include people in your photos
Summer is a wonderful time to visit the beaches, but it is important to avoid taking photos of others. You should avoid people in the background as they can distract viewers. Because they show bathing suit-clad people, beach photos can be aspirational.
Water movement
The waves of the beach move vertically but change in motion as they near the shoreline. This frictional force alters the orbit of the wave from a circular one to one that is more elliptical. This changes the speed of the wave. The wave speeds up as it travels along the shoreline. At the top, it is faster and at the bottom it slows down. The bottom wave eventually crests, creating an breaker.

A tripod is recommended
A tripod is a great idea for taking beach photos. It will allow you to use longer exposures and lower shutter speeds. This will help you keep sharp images in low-light situations. Tripods are also useful for capturing water's movement without blurring. Tripods also allow you to use darken or polarizing shadows. This can make all the difference in your beach photographs.
FAQ
Do I Need A Tripod?
This is one question that everyone wants to know. While a tripod isn’t necessary every time, it is useful.
A tripod allows you to stabilize your camera when taking photos at slow shutter speeds. A tripod can be very useful if you want to photograph landscapes and stationary subjects.
However, a tripod can blurriness if you are photographing moving subjects, such as people or athletes. How do you decide which situations are best served by a tripod.
A tripod is an essential tool for photographing fast-moving subjects or stationary objects. Examples include:
-
Sports
-
People
-
Landscapes
-
Close-ups
-
Macro shots
You can use this test to determine whether you need a tripod. Keep your camera still, and then look through the viewfinder. If blurred lines appear or you feel movement, you will definitely need a tripod.
If you don’t see blurring, adding a tripod is unlikely to make any difference.
If you do decide on a tripod purchase, these are some things to remember.
-
Smooth legs are a must for your tripod. This helps prevent vibrations that could shake your camera.
-
A tripod is a good choice. Some tripods made of plastic may not last very long. Consider a tripod made of metal.
-
You may want to consider buying a remote-control device. This remote control lets you remotely control your camera. This allows you to set the shutter to automatically fire when you press it.
-
You should look for a tripod with 360 degree rotation. This makes it easier for you to position your camera horizontally, or vertically.
-
Keep in mind that tripods aren't cheap. Expect to pay $100-200. However, you'll get a lot of value for your money.
-
Don't forget accessories such as memory cards or filters.
-
Before shopping online, be sure to visit your local shop. Many retailers offer free shipping.
-
You can read customer reviews to see what people think of a product.
-
Ask friends and family members who own similar products.
-
For customer feedback, visit message boards and forums.
-
You can search online for reviews from other users.
-
Use websites like Amazon.com to compare prices and read customer feedback.
-
Take a look at these photo galleries to see what other photographers do with tripods.
Is photography a talent?
Photography isn't a talent, it's an art form that takes practice, training, as well as experience. It takes years to master any aspect.
Photographing is a business that requires a plan.
To do this, you need to understand what kind of clients you want to attract and find ways to reach them.
You must know their identity and what they want. You must learn to communicate clearly and persuasively to persuade them to buy your services.
This means you need to be prepared and well-organized when meeting potential clients.
You will need to have a portfolio of work before you can approach potential customers. This can be done digitally using software programs or printed onto paper.
Once you have created a portfolio, you must look for opportunities to show it off. This could mean approaching businesses directly or advertising online.
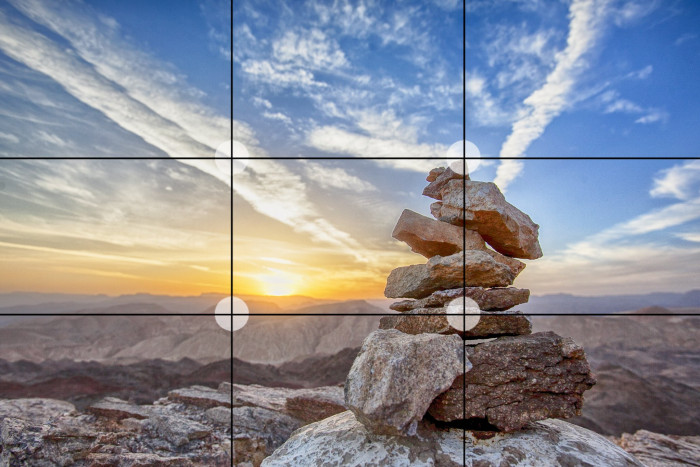
What is the rule of thirds in photography?
The rule to thirds is a great way to create interesting compositions. It divides your image in nine equal parts, vertically and horizontally. This creates three main areas for your subject to appear. These areas are the top, middle and bottom. These areas can be used as guidelines for positioning your subject within the frame.
The rule of Thirds helps you avoid placing crucial elements too close together. They may not be able to create a strong visual impact if they are too close together. If they are placed too far apart, it can cause them to lose focus.
How can I improve my photography skills on my phone?
Amazing photos are possible with minimal equipment. Amazing images are possible with just a smartphone.
It is easy to learn how to use its various features and some basic techniques.
There are many apps available for both Android and iOS devices that make it easy to edit and share your pictures.
Here are five tips to help get you started taking better photos.
-
Set Up Your Camera App. Your camera app should already be installed on your device. If not, download it from Google Play or Apple's App Store.
-
Use Filters & Effects. You can change the look of your photo with filters and effects without even touching it.
-
Adjust Exposure. You can adjust exposure to alter the brightness of your image.
-
Make sure you are shooting in the right light. It is easier to see details when you shoot in bright light. If you shoot in low light, it is possible to capture shadows or highlights in your photo.
-
Photograph People. Taking pictures of people shows others the things you love most.
You can learn more about how to capture better photos by checking out our article, 5 Tips To Improve Your Photography Skills on a Smartphone
Statistics
- The second easiest way to get blurry photos 100% of the time is to use a cheap filter on the front of your lens. (photographylife.com)
- While I cannot prove that all of those spots were not sensor dust, the photo was taken during a heavy snowstorm…so I guess that 99.8% of the spots are snowflakes. (bhphotovideo.com)
- In this case, 100% of readers who voted found the article helpful, earning it our reader-approved status. (wikihow.com)
- This article received 13 testimonials, and 100% of readers who voted found it helpful, earning it our reader-approved status. (wikihow.com)
External Links
How To
How to Take Portrait Photos
Portraits are important because they show who you are. They can also tell your life story. You may have a favorite picture of yourself when you were younger, but now you want to capture something new. It is easy to forget the joy of taking photos. These tips will help you get started.
-
Make sure that you have enough light. The best time to photograph portraits is in the morning and late afternoon. Avoid direct sunlight shining directly onto your face, if flash is used. This will wash out any details. Also, don't shoot at noon. There will be too much shadow.
-
Use a tripod. If you are holding the camera still, there will be no movement. That means you'll miss the chance to freeze action. And if you're going to use a flash, set up your shot first without it. Then turn off the flash and try again.
-
Close-ups are best. Closeups are great to demonstrate detail. But they can look fake unless you've got a good eye. Take a close look at the eyes, mouths, noses and ears of others. Are there any unusual features? Are glasses worn by someone? Are there freckles under her nose or on her eyes? These details add depth to an individual's appearance.
-
Smiles are not something you can force. Smiles are difficult. People smile when they feel happy. But some people don't. Forcing them to smile is a bad idea. Think about what makes you laugh. Maybe it's something silly like a cat jumping through a hoop. Perhaps you simply love watching paint dry. Whatever it is, keep thinking about it until you start laughing.
-
Find your creative side. People think they're boring. However, being boring is not a bad thing. You can find ways to be different from the norm. Ask someone to pose behind their back with his hands in front. You might also suggest that he wears a funny hat.
-
Keep practicing. Keep practicing. You'll eventually become more skilled at capturing moments. You will notice more interesting things as you get better.
-
Have fun. Shooting photos should be enjoyable. If you enjoy the process, you'll be more likely to do it again. You'll likely end up with some truly amazing shots.
-
Share your work. After you've learned how to take beautiful pictures, share them among your friends and family. Tell them why it was taken. Tell them where you went. Let them know what your experience was.
-
Be patient. Sometimes it just doesn't work. It happens to everyone. Don't worry. Keep moving on to another image.